When working on Python projects, using a virtual environment is essential. It keeps your dependencies isolated, prevents version conflicts, and makes your projects more portable. Recently, while setting up a virtual environment in Visual Studio Code (VS Code) for a new project involving interactive maps using Plotly and Geopy on a freshly installed Windows 11 Home edition (version 25H2), I encountered a system error during activation. The issue occurred because the system’s script execution policies were restricted. In this article, I will explain what this policy means and how to change the settings to avoid errors when activating a virtual environment.
Why Use a Virtual Environment?
A virtual environment (VE) creates a sandbox for your project. Instead of installing packages globally (which can cause conflict) you install them inside this isolated environment. This is especially useful when working on multiple projects that require different versions of libraries. In the next few steps, I will explain how to set up a VE, where you might encounter potential issues, and how to fix them.
Step 1: Create Your Project Folder
First, navigate to your project folder in VS Code’s integrated terminal (For easy access from any device, I recommend placing the project folder in OneDrive or a similar cloud service):
cd C:\Users\username\OneDrive\Projects\PythonThis ensures all files and configurations stay organized in one place.
Step 2: Create a Virtual Environment
Run:
python -m venv venv_project_name- python – runs Python;
- -m venv – uses Python’s built-in module to create a virtual environment;
- venv_project_name – is the name of the folder that will store your environment.
After running this command, you’ll see a new folder named venv_project_name inside your project.
Step 3: Activate the Virtual Environment
That is where I have encountered a problem. Normally, you activate it like this:
venv_project_name\Scripts\Activate.ps1But instead of activating VE, I got the following error:
C:\Users\username\OneDrive\Projects\Python\venv_project_name\Scripts\Activate.ps1 cannot be loaded because running scripts is disabled on this system.This problem occurred because the PowerShell’s execution policy, which is a safety feature that defines when scripts and configuration files can run, helping prevent accidental or malicious script execution, was set as Restricted by default in Windows environment. It isn’t a strict security system (users can bypass it), but it sets basic rules for script execution. Policies can be applied at different scopes: local computer, current user, or session (temporary). On non-Windows systems, the policy defaults to Unrestricted and cannot be changed. If you want to learn more about the execution policies, you can do it by clicking here to access official Microsoft Learn platform.
Step 4: Fixing the Error
To fix it:
- Open PowerShell as Administrator;
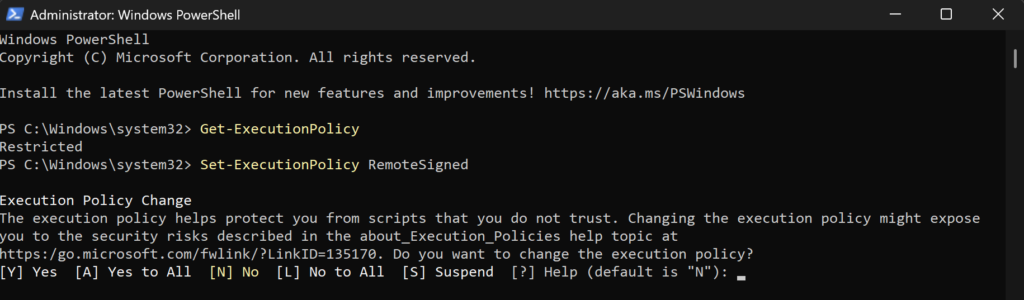
- Check the current policy:
Get-ExecutionPolicy
If you encountered the same error, most probably you will find Restricted in the output, like it was in my case.
- Change it to allow local scripts:
Set-ExecutionPolicy RemoteSigned- Confirm with “Y“, when prompted.
Set-ExecutionPolicy -Scope Process -ExecutionPolicy BypassExecuting that command allowed me to fix the error, and I successfully activated the virtual environment. If you’re unsure whether it’s safe to change this setting, don’t worry — RemoteSigned is a common configuration for developers. It blocks malicious remote scripts while allowing your local virtual environment activation script to run.