Do you want an original and attractive icon for your website? Create it yourself — this article will show you how.
A favicon (short for FAVorites ICON) is a small standard or custom icon that appears to the left of a URL in a web browser’s address bar. These icons are also used in bookmarks next to the site name, in browser tabs, or as shortcuts for web pages on the desktop or in other Windows folders. The typical size of such an icon is 16×16 pixels — the standard format for this type of graphic. The main purpose of a favicon is to make your website’s design more cohesive and visually refined.
All you need to do to add an icon to your site is place the finished favicon in Windows Icon (.ico) format into the root directory of your website. Most modern browsers, except Internet Explorer (IE), support icons in GIF format (including animated versions) and PNG (with full transparency). However, since absolutely all browsers — including IE — recognize the .ico format, which has features not replicated in GIF or PNG, this article focuses specifically on creating .ico icons.
System Requirements
Since we’ll be creating icons in Photoshop, we need to enable the program to work with the Windows Icon (ICO) format. Photoshop does not support .ico files out of the box, so we’ll need a small plugin that adds this functionality.
Today, the most reliable and widely used option is the ICO file format (64-Bit) for Windows, which is still maintained and available through trusted software archives. One of the most accessible sources is CNET Download, where you can find the plugin in both 32‑bit and 64‑bit versions.
The plugin allows Photoshop to:
- Open and save
.icoand.curfiles - Work with 1‑, 4‑, and 8‑bit indexed icons
- Save 24‑bit RGB icons
- Create 32‑bit icons with an 8‑bit alpha channel (full transparency)
- Handle multi‑resolution icon files (e.g., 16×16, 32×32, 48×48, 256×256)
Installing the Plugin
- Download the ICO plugin from a reputable source such as CNET Download.
- Extract the downloaded archive.
- Copy the ICOFormat64.8bi file into the Photoshop plugin directory:
x:\Program Files\Adobe\Adobe Photoshop\Plug-ins\File Formats\- Replace x: with the drive letter where Photoshop is installed.
- Launch or restart Photoshop.
After installation, Photoshop will be able to save icons directly via File → Save As → ICO, allowing you to create proper multi‑resolution favicon files without relying on external converters.
Getting Started
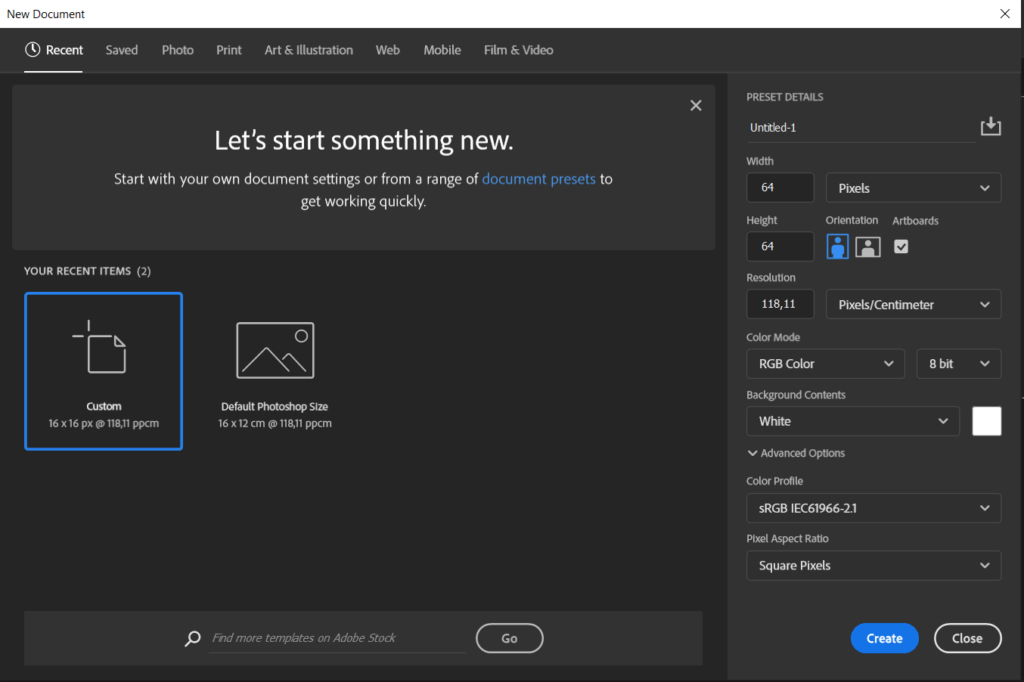
Since a 16×16‑pixel workspace is far too small for comfortable image editing, it’s better to begin your project with a canvas of at least 64×64 pixels. In fact, using a larger size is always preferable when creating icons — it gives you more room to express your creative ideas, and you can easily scale the image down later while preserving the proportions.
To set the required canvas size, go to File → New in Photoshop or press Ctrl+N.
Icon Design
If you already have a larger version of your logo, try scaling it down to 16×16 pixels and see how well it looks. If the logo becomes hard to recognize at that size and loses its visual clarity, create a 64×64‑pixel canvas and design the simplest possible icon that incorporates your website’s main colors.
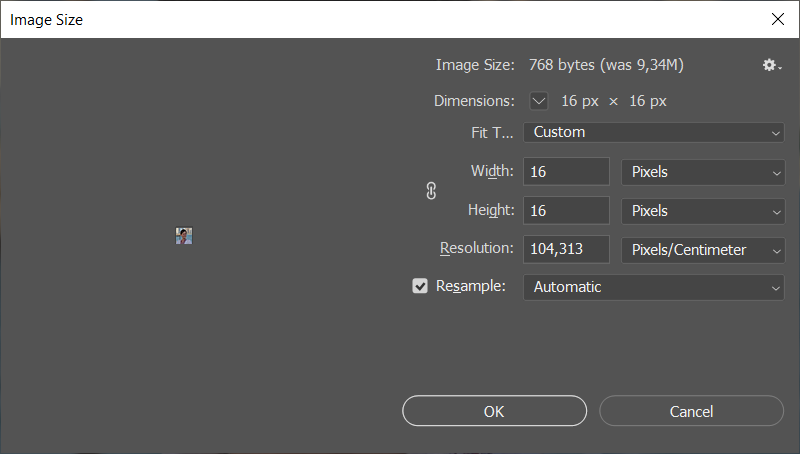
When you’re ready to test your design, go to Image → Image Size or press Alt+Ctrl+I, set the size to 16×16, and choose Bicubic Sharper as the interpolation method. This option works best for reducing images and helps you evaluate whether your icon becomes “blurry” when scaled down. If the result still looks unclear, return to the original image and make your design sharper, more saturated, and/or more contrasty, then scale it down again.
If your icon still doesn’t look the way you envisioned, keep refining and adjusting it until it matches your idea as closely as possible. Working at such small sizes can take some time before everything looks just right.
Saving and Exporting the Finished Icon
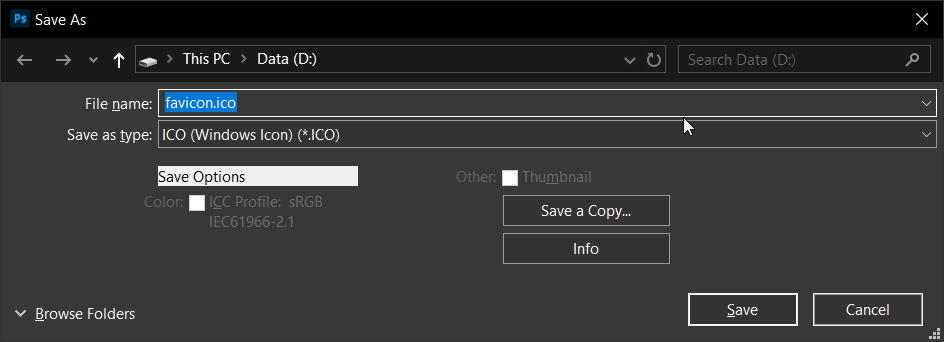
To save your final result, go to File → Save As or press Shift+Ctrl+S, and specify the required filename “favicon.ico”. In the Format dropdown menu, select Windows Icon (ICO). This format will only appear in Photoshop if you have downloaded and correctly installed the necessary plugin and chosen a compatible color mode when creating your document (1‑, 4‑, or 8‑bit Indexed Color, or 24‑bit RGB).
Next, place the new icon in the root folder of your website. To do this, connect to the server where your site is hosted and upload the created favicon.ico file. This file must be placed in the same folder as your home page (index.html), not in the images folder or any other directory, because the standard location for this file is the root folder of the site. If the file is correctly placed (and its name is exactly favicon.ico), most browsers will automatically recognize it.
However, for some browsers, you need to provide a direct link to your site’s icon in the HTML code. Specifically, you should add it to the header of every page where you want the favicon.ico to appear.
<link rel="Shortcut Icon" href="/favicon.ico">In most modern themes for Joomla, WordPress, and other CMS platforms, special files are used (for example, “header.php”), where you only need to add this line once at the beginning of the file, and all pages will automatically apply the specified settings.
There is also an alternative version of writing the same code:
<link rel=”icon” href=”/favicon.ico” type=”image/x-icon”>
If you’re unsure which option is right for you, include both lines.
Don’t forget to save the changes to the modified files or upload the edited pages back to the server, if the modifications were made in a local copy of the site so the changes are reflected.
To use an icon in .gif or .png format, add the following lines:
For .gif:
<link rel="icon" href="/favicon.gif" type="image/gif"> For .png:
<link rel="icon" href="/favicon.png" type="image/png"> However, keep in mind that both of these formats are not supported by Internet Explorer and will not work in it.
Multi-Size Favicon
In addition to the standard favicon size of 16×16 pixels, which is used for the address bar, there are larger versions with dimensions of 32×32 pixels and 48×48 pixels. These icons are widely used in the Windows environment. For example, if you create a shortcut to a web page on your desktop, Windows will automatically try to use the favicon as the shortcut image. Therefore, the standard size of favicon.ico (16×16 pixels) is not sufficient for high-quality display because the default shortcut size in Windows is 48×48 pixels. This means the favicon will be stretched to fit, resulting in a distorted and nearly unreadable image.
However, there is a way to fix this limitation. One useful feature of .ico files is that they can contain multiple versions of the same icon with different sizes and color depths (similar to how .gif files can hold multiple frames). Therefore, if you include several sizes and color depths in your favicon.ico file, Windows will automatically select the most appropriate version for the shortcut. The most common icon sizes that can be used are 16×16, 24×24, 32×32, and 48×48 pixels.
Creating a multi-size icon is not much more difficult than creating a standard 16×16 pixel favicon. You can use the necessary free software like ICOBundle, available to download from SoftwareSea website. It allows you to include multiple icons in a single .ico file. It’s a standalone program that can be used on different platforms – on Windows (via the command line) and on macOS (by simple drag-and-drop). There are also alternative programs available, such as Sib Icon Studio and Any to Icon Converter.
Regarding color depth, you may have noticed that some icons have jagged edges, while others look smooth and polished. This is possible thanks to 32-bit color depth, which supports true transparency—similar to Photoshop. You can create a 32-bit version of the icon along with a 24-bit version (16 million colors, with transparency support like in .gif files), a 16-bit version (256 colors), and even 8-, 4-, or 2-bit versions, and include them all in a single .ico file.
Therefore, if you want to ensure your favicon looks great in all possible scenarios, it’s best to create it in several variations, for example:
- 16×16, 16-bit (256 colors)
- 16×16, 32-bit colors
- 32×32, 16-bit (256 colors)
- 32×32, 32-bit colors
- 48×48, 16-bit (256 colors)
- 48×48, 32-bit colors
However, don’t go overboard by creating too many versions, as each addition increases the size of the favicon.ico file, which can negatively affect loading times.
Troubleshooting Possible Issues
Common Problems
If your favicon still doesn’t appear after completing all the steps, try refreshing the page several times (about 5), clearing your browser cache, or adding a “?” at the end of the URL, for example:
http://diego.com.ua/?This forces the browser to treat the page as new and bypass the cache. Another solution is to access the favicon directly via its URL, for example:
http://diego.com.ua/favicon.icoAfter doing this, Internet Explorer will immediately display and remember the icon. Otherwise, you can use a WordPress plugin, like WP Fastest Cache, to clear the cache and see the changes.
Microsoft IE (versions 6, 7, 8, and 9) may not display the favicon until the page is added to Favorites. In that case, try the following trick: click and hold the displayed favicon (usually the default IE icon), “shake” it slightly, and release. This action forces the page to reload and update the icon.
Another method is to add the following code to the <head> section of every page where you want the favicon to appear:
<link rel="shortcut icon" href="favicon.ico">
<link rel="icon" type="image/ico" href="favicon.ico">
Safari on macOS will not show the updated favicon until its cache is cleared. Simply clicking “Empty Cache” in the menu won’t work because Safari stores icons in a separate folder. To clear this cache, go to Edit > Reset Safari and check Remove all website icons.
Alternatively, manually delete the contents of this folder:
User > Library > Safari > IconsFor Safari on Windows, the path is slightly different:
C:\Documents and Settings\YourUserName\Local Settings\Application Data\Apple Computer\SafariDelete the file WebpageIcons.db. Note that the Local Settings folder and its subfolders are hidden by default, so you’ll need to enable the display of hidden files and folders in Windows. After deleting the files, restart Safari (and in some cases, reboot your computer).
Mozilla Firefox: Clear the browser cache and restart the program.
Opera: This issue does not occur, so simply refresh the page (possibly several times) after updating your favicon.
Windows Shortcut Icon Refresh
Another issue in Windows is updating icons for web page shortcuts (e.g., when placing a page shortcut on the desktop). To force an update of changed icons:
- Right-click on the desktop.
- Select Properties (Windows XP) or Personalize (Windows Vista/7), then go to the Display Properties tab.
- Change the color quality from 32-bit to 16-bit and click OK or Apply.
- Switch back to 32-bit color quality and click OK or Apply again.
Photoshop Plugin Issues
The Windows Icon (ICO) format will be unavailable if:
- The plugin was installed incorrectly.
- You selected the wrong plugin version for your OS.
- The Photoshop workspace was not created in 1-, 4-, 8-bit indexed or 24-bit RGB modes.
After installing the plugin, restart Photoshop for the changes to take effect.